Installing Django on PythonAnywhere
Before you start this assignment, you should already have signed up for a PythonAnywhere account and be logged in on your account. You should be able to complete all of the exercises in this course using a free PythonAnywhere account.
You can view a video walkthrough of installing Django 4.2.
Note: If you are submitting these assignments to the auto grader you should complete each assignment and then submit it and get full credit before moving on to the next assignment. Because the assignments build on one another the application that you have build by the last step of the tutorial will no longer pass the earlier autograders.
Note: Sometimes browser plugins like add blockers or privacy tools break your use of PythonAnywhere's browser-based development environment. If you experience weird problems like a hung browser, first turn off some of your extensions/addons/plugins. And if the problem persists use a different browser to test.
Setting Up Your Environment
Once you have created your PythonAnywhere account, start a bash shell
and set up a virtual environment with Python 3.x and Django 4.2.
mkvirtualenv django42 --python=/usr/bin/python3.9
pip install django==4.2.7 ## this may take a couple of minutes
Sometimes these two commands take a long time. Run them one at a time in the
shell. When the servers are running slowly, each command can take more than ten
minutes to finish. Be patient and wait until you see the $ prompt indicating
the command is complete before continuing.
Note if you exit and re-start a new shell on PythonAnywhere - you need the following command to get back into your virtual environment in the new bash shell unless you enable it automatically as shown below.
workon django42Lets make sure that your django was installed successfully and you are running the right version of Python with the following commands:
python --version
# This should show something like Python 3.9.5
python -m django --version
# This should show something like 4.2.7
Automatically Enabling Your Virtual Environment
Each time you start a new shell, you will need to activate your virtual environment. It
is a lot simpler to do this automatically every time you login by editing the .bashrc file
in your home directory.
/home/(your-account)/.bashrcLook for lines near the end of the file that look like:
# Load virtualenvwrapper
source virtualenvwrapper.sh &> /dev/null
Add the following lines to the file and save the file.
# Auto switch into django42 virtual environment
workon django42
The next time you start a console/shell, the shell should be using the django42 environment
and you should see the virtual environment indicator in your shell prompt:
(django42) 13:29 ~ $Installing the Sample Code for DJ4E
Lets also get a copy of the sample code for DJ4E checked out so you can look at sample code
as the course progresses and install some important additional Django software libraries using
pip.
cd ~
git clone https://github.com/csev/dj4e-samples
cd ~/dj4e-samples
pip install -r requirements42.txt
The pip command can also take a few minutes to complete. Once it finishes and you
get the $ prompt again, check for a good instlal by running:
cd ~/dj4e-samples
python manage.py check
This is the normal output of running check:
When you want to use social login, please see dj4e-samples/github_settings-dist.py
Using registration/login.html as the login template
System check identified no issues (0 silenced).
If you see a SyntaxError
If the check identifies errors, do not go on to the rest of the assignment
once you can run check and there are no errors. If you see this error:
python manage.py check
  File "manage.py", line 17
    ) from exc
         ^
SyntaxError: invalid syntax
Do not edit your manage.py file - the problem is never in that file.
There are several possible reasons for this:
-
It can mean that you are not running in the virtual environment (
workon django42) and mistakenly running Python 2 instead of Python 3. There is no error inmanage.py- it is valid Python 3 syntax that confuses Python 2. - It can mean that you have edited your
manage.pyfile and have introduced a syntax error. Take a look at this screen shot of a working manage.py and check if there are any differences. While you are there you can change line 1 from 'python' to 'python3' and the syntax error indication will go away. Often the mistakes are on the indentation of lines 16 and 17. Check and match the indentation in the screen shot exactly.
When running 'check' works
Once the check works do:
python manage.py makemigrationsThis is the normal output of the makemigrations:
When you want to use social login, please see dj4e-samples/github_settings-dist.py
Using registration/login.html as the login template
No changes detected
Then run:
python manage.py migrateIf you are doing this for the first time, it should run some migrations and create a file db.sqlite3.
The dj4e-samples folder is reference material that you can use through
out the course. From time to time we might make changes to this and ask you to
do a git pull to get the latest version of the code.
Building Your Application
Now that we have your Django set up and you have retrieved the sample code for DJ4E and installed required libraries, lets build your first application in the PythonAnywhere console / bash shell:
cd ~
mkdir django_projects
Once you have made a folder in your home directory, lets go into that folder and make a Django project.
cd ~/django_projects
django-admin startproject mysite
At this point startproject has created a folder named mysite with the following files and
sub-folders.
django_projects/
    mysite/
        manage.py
        mysite/
            __init__.py
           asgi.py
           settings.py
           urls.py
           wsgi.py
While it seems a bit counter-intuitive, there is folder called mysite within the folder
mysite. We tend to refer to this folder as mysite/mysite to make sure we are talking
about the project-wide settings. The files in this project-wide folder are have the following purposes:
-
manage.pythis is a Python script that is use to run commands to administer your Django server. Examplemanage.pycommands we will use eventually arecheck,createsuperuser,migrate, etc. We never change this file. -
mysite/settings.pycontains your overall project-wide configuration. You set up application loading, database connections and other global variables for your project in this file. When you reload your application under theWebtab on PythonAnywhere themysite/settings.pyis the first file that PythonAnywhere reads to start your application. -
mysite/urls.pycontains the overall URL prefix mapping. If you look at this file, you will see that URLs with the prefix of/adminare routed to the built-in Django administration screens which we will use much later. mysite/wgsi.pyandmysite/agsi.pyare the starting points to plug our application into a hosting system like PythonAnywhere. We never change these files.
You only should run the startproject command once - it will fail if you try to run it twice. There
are instructions to delete then entire mysite foder and start over at the bottom of these insnstructions.
At this point, keep your shell open in one tab and open the PythonAnywhere Files application
in another browser tab and navigate to the ~/django_projects/mysite/mysite/settings.py and change
the allowed hosts line (around line 28) to be:
ALLOWED_HOSTS = [ '*' ]Leave the DEBUG value set to True - we are not really "in production" and if you set this to False you will not see error messages when you make mistakes.
Then save the file. Do not "Run" the file - just save it - it will be loaded later.
Running Your Application
Now that we have built your first application, we need to tell PythonAnywhere where to look to run your application as a web server so you can test it.
In the PythonAnywhere web interface navigate to the Web tab to create a new web application. You do not need
to upgrade your account - they give you one application like drchuck.pythonanywhere.com - use this
free application for the course.
When making the new application, do not create a "Django application" - instead,
select manual configuration and match the Python version to the version that you used in
your virtual environment above. Once the webapp is created, you need to
make a few changes to the settings for the web app and your application.
Source code: /home/drchuck/django_projects/mysite
Working directory: /home/drchuck/django_projects/mysite

Virtualenv: /home/drchuck/.virtualenvs/django42
Replace drchuck with your account on PythonAnywhere.
Note that once you have your Virtualenv set up you have a very convenient link titled "Start a console in this virtualenv" - this is a great way to open up consoles so you never have to type "workon django42" and it makes sure your virtual envronment is properly set up and configured. Sample image
Then edit the WGSI Configuration File and put the following code into it. Make sure to delete the existing content of the WGSI Configuration File file and completely replace it with the text below. This is slightly different from the sample in the PythonAnywhere tutorial.
import os
import sys

path = os.path.expanduser('~/django_projects/mysite')
if path not in sys.path:
    sys.path.insert(0, path)
os.environ['DJANGO_SETTINGS_MODULE'] = 'mysite.settings'
from django.core.wsgi import get_wsgi_application
from django.contrib.staticfiles.handlers import StaticFilesHandler
application = StaticFilesHandler(get_wsgi_application())
Once the above configuration is complete, go back to the top of the PythonAnywhere
Web tab, Reload your web application, wait a few seconds and check
that it is up and visiting the URL for your application shown in in the Web
tab on PythonAnywhere like:
http://(your-account).pythonanywhere.com/Here is a Sample of what the resulting page should look like.
Just as a note, you never run the runserver command on PythonAnywhere.
python manage.py runserverIf you try to do runserver on PythonAnywhere it, you will see an error message like this
00:26 ~/django_projects/mysite (master)$ python manage.py runserver
Watching for file changes with StatReloader
Performing system checks...
System check identified no issues (0 silenced).
September 14, 2021 - 00:26:16
Django version 2.2.7, using settings 'mysite.settings'
Starting development server at http://127.0.0.1:8000/
Quit the server with CONTROL-C.
Error: That port is already in use.
00:26 ~/django_projects/mysite (master)$
This will never work on PythonAnywhere. You run / restart your server on
PythonAnywhere using the "reload" button on your Web tab. So
if you are reading any Django instructions that say to do a runserver, instead do a
check and then reload the application in the PythonAnywhere web UI.
Adding Your Polls Application
At this point, we are going to add the polls application from the first Django tutorial. The instructions below are specialized on how to do the first tutorial specifically on PythonAnywhere.
First create the polls application. A Django "project" is contains multiple Django "applications".
The polls application is the first of several that we will build in this course. Each application
will be stored in its own folder under mysite.
cd ~/django_projects/mysite
python manage.py startapp polls
You should only run this command once. It creates a new folder under mysite called polls
with the following skeleton files for your new application:
django_projects/
    mysite/
        manage.py
        mysite/
            __init__.py
           asgi.py
           settings.py
           urls.py
           wsgi.py
         polls/
            __init__.py
            admin.py
            apps.py
            migrations
                __init__.py
            models.py
            tests.py
            views.py
Write your first view in the mysite/polls/views.py file:
from django.http import HttpResponse

def index(request):
    return HttpResponse("Hello, world. You're at the polls index.")
Then create the mysite/polls/urls.py and put the following code into it:
from django.urls import path

from . import views

urlpatterns = [
    path("", views.index, name="index"),
]
Then edit the mysite/mysite/urls.py and insert a new include() line for the
new mysite/polls/urls.py:
from django.contrib import admin
from django.urls import include, path

urlpatterns = [
    path("polls/", include("polls.urls")),
    path("admin/", admin.site.urls),
]
The idea behind include() is to make it easy to organize the URL names across
multiple application folders.
Since the urls "within" polls are in their own URL configuration file (mysite/polls/urls.py),
they can be mounted under /polls/, or under /fun_polls/, or under /content/polls/,
or any other path root, and the within-application poll URLs will still work relative
to that path root.
At this point you have created a new view (named index), added a route to
the view in mysite/polls/urls.py, and mounted the urls for the polls application
into the project-wide URL routing file mysite/mysite/urls.py. There are two files
named urls.py in two different folders. One file is for the overall (soon to be
multi-application) project (mysite) and the other file is for your first
application (polls).
To see if you have made the modifications correctly, run the following commands in a bash shell console on PythonAnywhere:
cd ~/django_projects/mysite
python manage.py check
Running this command checks for syntax and logic errors in your Django application. It is easier to fix errors in the command line.
Important: If you find an error, you need to stop and go back and fix the error,
running python manage.py check repeatedly until there are no errors.
Once there are no error, navigate to the Web tab in PythonAnywhere
and Reload your application and then test your application by navigating to:
(your-account).pythonanywhere.comYou should see a page that looks like:
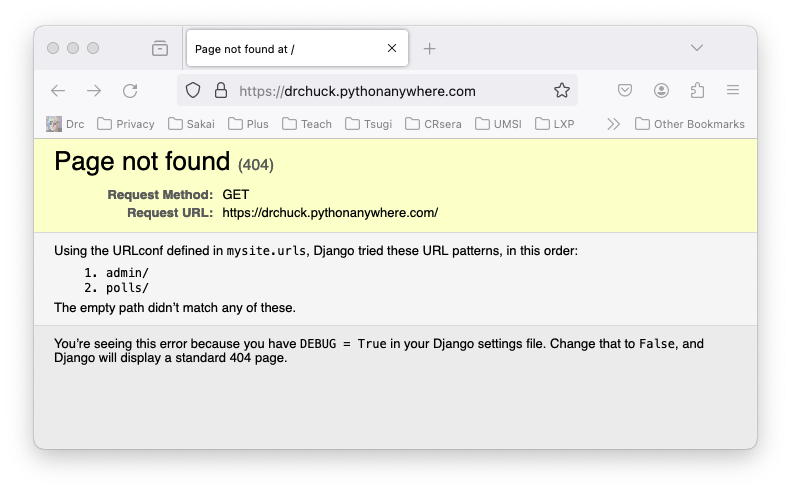
This page is a "404 Error" which means that Django could not find a route in your application for the
"empty path". Because you have DEBUG = true in your mysite/mysite/settings.py,
Django tells you have not yet told
it how to route the "empty path" and it tells you all the paths it knows how to route.
This 404 error is OK at this point in the tutorial. Later we will add a route in
mysite/mysite/urls.py for the "empty path" - but for now we can change the URL to
add polls to route to the application that you just created.
(your-account).pythonanywhere.com/pollsYou should see a line that looks like:
Hello, world. You're at the polls index.Going forward, every time we make changes to our application, we should run
cd ~/django_projects/mysite
python manage.py check
in the shell, and when that shows no errors, navigate to the Web, press Reload,
and then go to your web site to test your changes. This pattern of change, check,
reload, and test will become second nature after a while.
Possible Errors
There are many possible errors you might encounter. We have an entire page of error recovery instructions that you might want to bookmark (Fixing Common Django Errors)
You may want to come back to this file throughout the course when you make a small change and end up with an error.
Editing Files on PythonAnywhere
There are three ways to edit files in your PythonAnywhere environment, ranging from the easiest to the coolest. You only have to edit the file one of these ways.
(1) Go to the main PythonAnywhere dashboard, browse files, navigate to the correct folder and edit the file
/home/drchuck/django_projects/mysite/mysite/settings.py(2) Or in the command line:
cd ~/django_projects/mysite/mysite/
nano settings.py

Save the File by pressing 'CTRL-X', 'Y', and Enter
(3) Don't try this most difficult and most cool way to edit files on Linux without a helper
if it is your first time with the vi text editor.
cd ~/django_projects/mysite/mysite/
vi settings.py
Once you have opened vi, cursor down to the ALLOWED_HOSTS line,
position your cursor between the braces and press the
i key to go into 'INSERT' mode, then type your new text and press the esc key when you are
done. To save the file, you type :wq followed by enter. If you get lost press escape :q!
enter to get out of the file without saving.
If you aleady know some other command line text editor in Linux, you can use it to edit files. In general, you will find that it often quicker and easier to make small edits to files in the command line rather than a full screen UI. And once you start deploying real applications in production environments like Google, Amazon, Microsoft, etc.. all you will have is command line.
Starting Over Fresh
If you have followed instructions and it just does not work and you want to start over at the beginning of this assignment, here are the steps to clear things out:
-
Remove all of your running consoles under the www.pythonanywhere.com Consoles tab
-
Open a new bash console from the Consoles tab. Do not run the workon command and run the following commands:
cd ~ rm -rf .virtualenvs/django42 rm -rf dj4e-samples rm -rf django_projects - Then go to the Web tab on www.pythonanywhere.com and Reload your application. It may give you errors - this is OK. We just want to make sure that no processes are left hanging on to old files.
Then close your console, and delete it under the Consoles tab and go up to the very beginning of this handout and start over.
We did not remove any of the configuration changes under the Web tab - so as you re-create all the files, parts of the Web tab may just start working when you Reload your application.